Nutanix : SATADOM is dead!

Background
I'm one of the many lucky early adopters of Nutanix and my first cluster is older than 7 years old now. Still in good condition and serving test VMs for years. This one was the proof of concept that leads the way to many other clusters. In good condition yes, until mid Jan when I discovered that I've lost one node out of 3 in that cluster!
What's wrong ?!?
I did not realise immediately that one node was down. Indeed, losing one node in a three nodes cluster is not an issue, all workloads were fine. I had to connect on Prism Element to create a new VM and I saw the alert. At first, it was not obvious that the node was unresponsive. I saw this alert :

I must admit, this GPU error message was ... very weird : 1) how comes that the GPU can be hot removed and 2) I don't have any GPU specific hardware in my NX-1050.
Next, I tried to connect on the CVM : it timed out.
Next, I tried to connect on the IPMI and get access to the physical node.
I saw a lot of messages on the console. Some strange, some related to disk errors. I tried to login as normal and saw this :

It takes ages to get the prompt. In the picture above, you see the MOTD and after few minutes I got the prompt. Each command I was typing took more than 30 secs to be executed. I thought this is related to the SATADOM.
The SATADOM is a flash technology used in the early days of Nutanix hardware. This is the boot drive that hold the hypervisor (in my case AHV). The node boots on the SATADOM and the CVM is stored on the SSDs (at the front of the server). So, if you lose the SATADOM, you are not totally in bad shape, you need to find a way to replace it and then reinstall the boot disk and the CVM will be taken from the SSDs.
If you want to determine if your SATADOM is really dead, you can try this command directly from the host :
# dd if=/dev/sda of=/dev/null bs=1M count=50
50+0 records in
50+0 records out
52428800 bytes (52 MB) copied, 0.91794 s, 57.1 MB/s
The above example is showing a "normal" behavior. If you speed is less than 15 MB/s, you have an issue.
Note : SATADOM are old flash technology and, as all flash devices, they have a read/write cycle. If you hit the write cycle, the device can be considered as dead. It becomes very slow and is in fact not usable anymore. Modern Nutanix hardware are using NVMe to boot these days.
At this stage, it is clear that I need to get a new SATADOM to continue the node recovery. There is an internal USB A port on the node but it won't work, this type of storage is blacklisted by Nutanix because their performance is even lower than SATADOM.
Get New SATADOM
Problem : the cluster is 7 years old as I mentioned earlier. So, end of Support/Sale. There is no way I can get new SATADOM. I tried the aftermarket, same thing : either very expansive, either lead time are months ....
I've found one on AliExpress. I know this is strange, but this is the only option I had. The wait was about 2 weeks and then YES !!!! Exactly the same as the one in my server. Soo cool !

When replacing the SATADOM, pay attention to the power cable. The connector is fragile and tweezers is not a luxury.

Make sure the power cable is router correctly and not obstructing the insertion/extraction of the node in the chassis.
Get the ISO to recover the SATADOM boot drive
As mentioned before, we haven't lost anything if we still have other nodes in a working cluster. Indeed, the last upgrade sequence probably left some binaries we can use in other CVMs.
You can easily recreate the boot disk with the right software version from other CVM but you need at least 10 GB of free space. You can flush the logs that are not required anymore to make some room.
Determine the best candidate using allssh df -f.
$ allssh df -h /home
================== 192.168.8.x =================
Filesystem Size Used Avail Use% Mounted on
/dev/sda3 40G 21G 18G 55% /home
================== 192.168.8.x =================
Filesystem Size Used Avail Use% Mounted on
/dev/sda3 40G 24G 15G 62% /home
================== 192.168.8.x =================
Filesystem Size Used Avail Use% Mounted on
/dev/sda3 40G 28G 11G 73% /home
When you have it, we are going to generate a Phoenix image that contains the relevant binaries to re-create the AHV host from scratch with a valid AHV and AOS version that match the cluster version.
You need to download AHV ISO Install from Nutanix Support Portal. My version is here. Once you have the file, copy it to the CVM from where you are initiating the actions in the /home/nutanix folder.
Here are the commands :
$ tar -cvzf /home/nutanix/foundation/nos/$(< /etc/nutanix/release_version).tar.gz -C ~/data/installer/ $(< /etc/nutanix/release_version) --transform="s:^$(< /etc/nutanix/release_version)/:install/:" --show-transformed-names
[be patient here, it will take a couple of minutes]
$ mkdir /home/nutanix/foundation/tmp
$ cd /home/nutanix/foundation/bin
$ ./generate_iso phoenix --temp-dir /home/nutanix/foundation/tmp/ --kvm /home/nutanix/AHV-DVD-x86_64-el7.nutanix.20190916.253.iso
[be patient here, it will take a couple of minutes]
When completed, SFTP out this file from the CVM to your computer, we will have to boot the node with that ISO.
In my case, the file is named phoenix-5.1.1-kvm-x86_64.iso
The full detailed procedure can be found on the Nutanix support portal.
Install the AHV Host
Using IPMI, you can easily mount an ISO as a virtual CDROM. This is pretty handy, especially when you are thousand miles away from the physical server.

When plugged in, restart the node. It will boot in "Phoenix" mode. This is a specific environment that allows various system activities (upgrading BIOS, disk and NIC firmware, ....) as well as node recovery.
When booted, you will see a menu :

You need to provide the node position (in my case it was B) using left and right arrows, choose Install and Configure hypervisor in the action section and choose next.
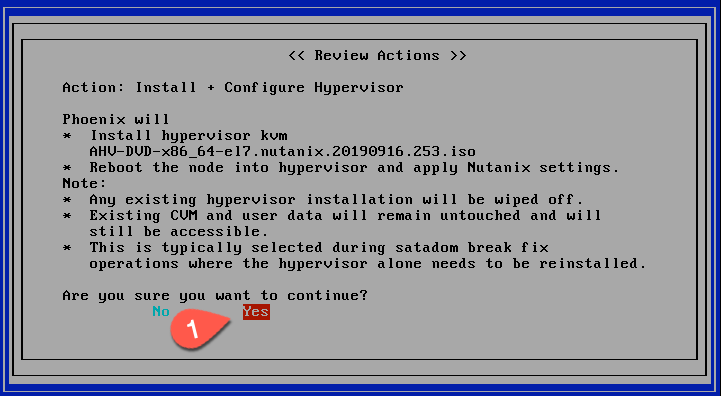
This screen is a summary of the actions, confirm you are ok with it and chose YES. The node will be re-installed and will restart a couple of time.


Answer 'Y' of course ;)
Leave this for 10 mins or so, have a coffee, you need it ! But, we are almost there.
Configure the remaining items
Now, the node has been re-installed and ready for login

Login as root (nutanix/4u)
Check if the CVM is detected and mounted with this command :
# virsh list --all
Id Name State
----------------------------------------------------
At this stage, the CVM was not found, let's wait for the configuration process to complete (another coffee ?)
At some point in time in the process you will see this :
# virsh list --all
Id Name State
----------------------------------------------------
1 NTNX-15SM15XXXXXX-CVM running
At this stage, I was not able to ping the CVM nor the node. Simple reason is : we have to configure the network.
From the Hardware section of Prism Element, you have all the IP settings. Write them down somewhere.
First step is to configure interface br0. By default, it is configured as DHCP and there are other parameters to configure.
Here is a sample /etc/sysconfig/network-scripts/ifcfg-br0 file. Adjust to your settings
# cat /etc/sysconfig/network-scripts/ifcfg-br0
DEVICE=br0
NM_CONTROLLED=no
ONBOOT=yes
BOOTPROTO=none
IPADDR=192.168.8.x
NETMASK=255.255.255.0
GATEWAY=192.168.8.x
It is safe to remove all previously existing line in this file and replace with the above adjusted content. Next, restart networking :
# service network restart
You also need to tell Open vSwitch what VLAN you are in. I'm in VLAN 8 :
# ovs-vsctl set port br0 tag=8
Now, you should be able to ping the node, maybe not the CVM yet.
From the node, ssh to the CVM and configure it to be part of the right VLAN. Again, in my case I'm in VLAN 8.
$ change_cvm_vlan 8
And, magic ! all of a sudden, the CVM is reachable from any hosts/CVMs in the cluster. Let's reboot to confirm everything is starting fine.
Let's start the Cluster !
Now, we have everything ready for the last step of the node recover : start the cluster services on the recovered node !
After the CVM started, all cluster service should start automatically, if not you can always issue a cluster start command at the CVM level.
In my case, the faulty node was back after node reboot (and a couple of minutes waiting). I could see in the Hardware section of Prism Element that the node is back !

To be on the safe side, let's make sure the node is not in maintenance mode :
$ acli host.list
Hypervisor IP Hypervisor DNS Name Host UUID Compute Only Schedulable Hypervisor Type Hypervisor Name CVM IP
192.168.8.x 192.168.8.y 79ce82b4-938b-4cc4-9efa-53664ff55165 False True kKvm AHV 192.168.8.x
192.168.8.x 192.168.8.y 0fa5a075-c3e3-4e95-a172-2048beea45aa False True kKvm AHV 192.168.8.x
192.168.8.x 192.168.8.y 0d8125c6-4eef-4e40-bbfd-760653382d39 False True kKvm AHV 192.168.8.x
To exit maintenance mode for a specific node, issue the following command from the CVM :
$ acli host.exit_maintenance_mode <physical_node_ip_address>
Once the host is not in maintenance mode (if it was), all VMs will be rebalanced across all the nodes in the cluster.
Also, make sure the metadata are well balanced across the nodes :
$ nodetool -h 0 ring
Address Status State Load Owns Token
zzzzzzzzH65SAiTOcPpVMLqRiExeAZZ9bXoodChDFuGmDokv7mP367PpOXPh
192.168.8.x Up Normal 43.06 GB 33.33% KfKfKfKfOJ7r7hZNlnPKqqxVuScMracnUE4zoHYiQGMWzOILFKUKWGeKXdqQ
192.168.8.x Up Normal 35.82 GB 33.33% fKfKfKfK8CL451SO5AmqBAE5eHVb3kEVmIMINALmRbYZjTFtiUAA6MHTTq6u
192.168.8.x Up Normal 42.26 GB 33.33% zzzzzzzzH65SAiTOcPpVMLqRiExeAZZ9bXoodChDFuGmDokv7mP367PpOXPh
If you see the metadata distribution is even, you are in good shape ! You can leave the cluster some time to recover from this heart attack. Ideally leave it overnight and check again the day after to see if everything is ok.
Enjoy a fresh "new" node !
This was quite a journey to reach this goal, I would probably never reach this successful tasks without the awesome support from Ryan Kennedy from Nutanix UK.
I hope other reader will take benefits from this procedure. I really saved my dying cluster.
Take care ;)


Comments
Post a Comment
Thank you for your message, it has been sent to the moderator for review...