Domoticz : How to record Water Usage

I like home automation and home improvement. One way to become more sustainable is to measure various home consumption (electricity, water, heating, ...). Then, base on the numbers, you can act appropriately and improve the overall figures. Recently, I have created a IoT device to measure and record my solar production, this time we will have a look at the water usage.
The Basics
Like most of you, I have an analog water meter to measure the home consumption. Not only the drinking water coming from the water company but as well on my rainwater tank, in order to have a rough idea and try to detect leaks.
The only condition for leaks detection is : make note of the consumption and create graphs to understand anomalies. Well. This is the theory. After few month, you get bored and you do not record anything.
This is actually where this post is coming from. Getting bored is not something computers are used to. So, let's ask the computer to record the data for me and import everything into Domoticz, the heart of my house.
How to read the data ?
This is my water meter, a list of digits reporting cubic meter usage and litres (in red).
.jpg)
I have found an OpenSource project based on ESP32-CAM that actually do the optical character recognition for me. The project is called "AI-on-the-Edge".

I'm not going to explain that section. The documentation in their wiki is simply amazing and can easily explain how to get that part done.
The interesting section is : how to send the data into Domoticz ?
Sending the data to Domoticz
Yes, indeed, this is the tricky part. The AI on the Edge project provides many ways to interact and read the data from the device : MQTT, API, InfluxDB, .... all these are supported by Domoticz, se we have to decide which one to use.
I currently do not have MQTT installed on my Domoticz machine, InfluxDB direct import is a bit too wild for me, so I will go the API way - using my favorite language of course : PhP ;)
How to read from IoT
It's easy, you simply have to navigate to your IoT device IP with the following URL :
http://<IoT_IP>/json
and you will receive something similar to this :
{
"main":
{
"value": "",
"raw": "01616.770",
"pre": "1618.770",
"error": "Neg. Rate - Read: - Raw: 01616.770 - Pre: 1618.770 ",
"rate": "",
"timestamp": "2023-04-19T00:32:12+0200"
}
}
Note : This output is actually reporting an error since the new value is lower than the previous. It means something is wrong with the pattern recognition. I may happen, in that case, I will simply ignore the reading.
{
"main":
{
"value": "1610.992",
"raw": "01610.992",
"pre": "1610.992",
"error": "no error",
"rate": "0.002664",
"timestamp": "2023-04-19T21:11:55+0200"
}
}
Note : This example is a successful reading without any error.
Of course, a CLI cURL will also do it, so we can easily code this and analyze the returned data for processing.
# curl http://<IoT_IP>/json
{
"main":
{
"value": "",
"raw": "01618.992",
"pre": "1610.992",
"error": "Rate too high - Read: 1618.992 - Pre: 1610.992 - Rate: 2.667",
"rate": "",
"timestamp": "2023-04-19T21:11:55+0200"
}
}
Ok, we can remotely access our home made sensor, great news. Let's go to Domoticz and try to create something useful.
Creating the Domoticz sensor
To record values, we need to define a sensor in Domoticz. This will be a sensor managed outside of Domoticz (via a script). We will create a dummy hardware to managed so called virtual sensors.
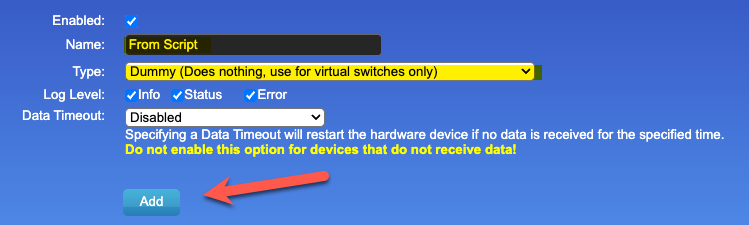
Go to Setup / Hardware

Then at the bottom of the hardware table, enter the below value and push Add.
From the newly added hardware row in the table, you have the ability to create a virtual sensor, push the button :

Enter a name and chose Counter as the type.

Coming back to the Domoticz main section, Chose utility in the top banner, then filter out by sensor name and chose Edit to configure the sensor with the required parameters :

We change the sensor icon with the water drop, we chose type as Water and there is way to enter the initial counter value to avoid a massive usage when the first value is recorded.

Now, we are ready to welcome the first values pushed by our script ! Oh, by the way, in the screen above, there is a Idx, write it down, we will use it in the next section.
Sending the data
Ok, let ssh to the Domoticz box and let's go to the script folder !
$ cd domoticz/scripts/php
(yes again php ;)
<?php
$espIP="192.168.1.x";
$domoticzIP="192.168.1.y";
$sensorIDX="6119";
// -------------------------------------------------------
// Function to retrieve the ESP32-CAM reading of the meter
// -------------------------------------------------------
function espGetValue($espIP)
{
$curl = curl_init();
curl_setopt($curl, CURLOPT_FOLLOWLOCATION, 1);
curl_setopt($curl, CURLOPT_HTTPHEADER, array(
'Accept: application/json, text/plain, */*',
'Content-Type: application/json;charset=utf-8'
));
curl_setopt($curl, CURLOPT_URL, "http://".$espIP."/json");
curl_setopt($curl, CURLOPT_RETURNTRANSFER, 1);
$result = curl_exec($curl);
curl_close($curl);
$result=json_decode($result);
if($result -> main -> error == "no error")
{
return $result -> main;
}
else return FALSE;
}
// ------------------------------------------
// Function to push data to a Domoticz sensor
// ------------------------------------------
function sendToSensor($domoticzIP,$sensorIDX,$val)
{
$API=$domoticzIP;
$curl = curl_init();
curl_setopt($curl, CURLOPT_CUSTOMREQUEST, "POST");
curl_setopt($curl, CURLOPT_POST, 1);
curl_setopt($curl, CURLOPT_FOLLOWLOCATION, 1);
curl_setopt($curl, CURLOPT_HTTPHEADER, array(
'Accept: application/json, text/plain, */*',
'Content-Type: application/json;charset=utf-8'
));
curl_setopt($curl, CURLOPT_SSL_VERIFYPEER, false);
curl_setopt($curl, CURLOPT_SSL_VERIFYHOST, false);
curl_setopt($curl, CURLOPT_URL, "https://".$API."/json.htm?type=command¶m=udevice&idx=".$sensorIDX."&nvalue=0&svalue=".$val);
curl_setopt($curl, CURLOPT_RETURNTRANSFER, 1);
$result = curl_exec($curl);
curl_close($curl);
if(json_decode($result)->status=="OK") return TRUE;
else return FALSE;
}
// =======================================================
// Entry point
// =======================================================
$res=espGetValue($espIP);
if(@$res->value)
{
print("-> Value is ".$res->value." m3\n");
print("=> Pushing data to Domoticz sensor...");
sendToSensor($domoticzIP,$sensorIDX,$res->value);
print("\nDone.\n\n");
$usage=(float)$res -> rate;
//print("-> Sending usage to ThingSpeak ".$usage." litre(s) ...");
//tsSendToChannel($apiKey,$channelID,$usage);
print("\nDone.\n");
}
else
{
print(">> Nothing to do.\n\n");
}
?>
Can't be simpler is it ? (do not forget to adjust the Domoticz IP and ESP-32 CAM IP at the top of the script !)
I have created a bash script calling this php script :
$ cat WaterMeter1Update.sh
#!/bin/bash
cd /home/pi/domoticz/scripts/php
php waterMeter.php
Then, every 5 mins, a cron is executing this script and pushes data straight into the sensor :
*/5 * * * * /home/pi/domoticz/scripts/php/WaterMeter1Update.sh
After few mins, you can start to see some data coming in the custom sensors. Adn after few month, you have amazing statistics and you can see when you a doing laundry, when you are filling up the pool, when you are away form the house, .... How cool is this ? ;)
Domoticz graphs are amazing, you have trends, details per week, month, comparison between years, days .... I love it !


Comments
Post a Comment
Thank you for your message, it has been sent to the moderator for review...