My journey with Nutanix Community Edition

Nutanix
You all heard about Nutanix right ? Nutanix is a software company who creates HyperConverged Infrastructure (HCI) solutions that enable easy IT in your datacenter and in the the cloud. More details on www.nutanix.com.
Beside the commercial product, there is a free edition called the Community Edition where tons of people contribute to the success of it. This freed edition works on very low end hardware such as Intel NUC or refurbished servers that may lay around in your datacenter stock (if they have the relevant VTDx CPU features enabled).
Nutanix Community Edition - for what ?
You may found many reasons why using the Community Edition one of them is just to try it out by yourself. But this is not limitative, you may want to do training, test softwares in your environment, virtualize workloads to confirm it actually works (at low/no cost), proof of concept/value, ... and many other reasons.
My goal was actually a mix of the above. My company is a Nutanix customer and I wanted to see the interaction that could be made between the commercial product and the Community Edition. Actually, there are lots ! But you need to be careful since there is actually no support - only the official Nutanix forum can help but without guarantee. In my case, I'm fortunate enough to have a Nutanix cluster on which I can "play". Another good reason is providing on the field compute and storage for a limited time - during a disaster for example.
So, I decided to create a 3 nodes cluster based on cheap Intel NUC. I've chosen the latest Gen 7 i7 model (NUC7I7BNH) with the maximum supported memory : 32 GB. On the storage side, I've added NVMe SSD for caching and metadata management and a 1 TB SSD to store the VMs. You will also need an USB drive that remains all time in the NUC. This is the boot drive where CE is stored. Since there is only one NIC on the NUC, you cannot really do high availability - and this is not the the goal of such deployment, remember, this is not supported.
You can have some sort of HA if deployed on other hardware platform : SuperMicro has amazing micro server hardware that can definitely be used too (up to 128 GB and 10 GbE). But of course this is increasing the cost of the lab.
[Edit 20th Feb 2018] A new version has been released CE v 5.5. It is bringing the Clam automation framework. An article will follow about it.
Here is my kit list
Compute & Storage
- Intel NUC7I7BNH Barebone PC
- Samsung 960 EVO SSD 500 GB
- Crucial CT16G4SFD824A RAM 16Go DDR4 2400 MT/s (PC4-19200) SODIMM 260-Pin (Qty. 2)
- Western Digital WDS500G1B0A SSD 2,5" 1TB
- SanDisk Cruzer Fit SDCZ33-016G-B35 USB Flash Drive, 16 GB
Networking
- TP-Link TL-SG108E Easy Smart Switch Administrable 8 Ports Gigabit
- TP-Link Routeur 450Mbps Wi-Fi N en 2.4 GHz, 5 ports Ethernet Gigabit
Misc hardware
- Portable screen (Gechic ON-LAP 1303H)
- Mini USB keyboard
- A case to pack everything with customizable foam
- Power strip
- Very short network cables
Some of the parts when they arrived:
 |
| Xmas day! |
Since my intention was to be as autonomous as possible, I have added a portable screen and a small USB keyboard to the list. A PDU is also needed and a case to pack everything at once. The case includes customizable foam so you can easily cut it to fit the content. I love it !
This is the secret agent suitcase:
 |
| Waterproof case from vidaXL |
 |
| Data Center in a Box |
 |
When fully deployed with keyboard and portable screen, I'm almost autonomous.
You may ask yourself about heat. It does heat - of course - but it looks like the temperature stabilized itself after 20 minutes of intensive usage and never goes up a certain acceptable value. I need to monitor this a little bit and probably share my measures here.
I have found a way to stabilize the heat using a very cheap USB fan. It looks fancy but surprisingly, it works quite well.

Configuration
Now, this is time to think at what you want to do. Community Edition works with single node cluster or 3 nodes and maximum 4 nodes. This is up to you. The more nodes, more VMs you can run on this cluster and more storage you have. There is no HA involved into the cluster size since there are a lot of SpoF with this kind of hardware.
|
Next, you need to get the Community Edition from Nutanix. You need an account with Nutanix for that, you can register here : http://www.nutanix.com/products/community-edition/
Windows users, you can use Rufus to create the USB boot disk.
Mac OS/Linux users use "dd"
$ diskutil unmountDisk
/dev/disk2
$ gunzip ce-2018.01.31-stable.img.gz
$ sudo dd if=ce-2018.01.31-stable.img of=/dev/rdisk2 bs=1m
$ gunzip ce-2018.01.31-stable.img.gz
$ sudo dd if=ce-2018.01.31-stable.img of=/dev/rdisk2 bs=1m
Once completed, eject the disk and boot your NUC.
 |
| Community Edition boot screen |
Important : You need to change the /home/install/phx_iso/phoenix/minimum_reqs.py file by reducing the minimum cores required from 4 to 2. Change the parameter MIN_CORES = 2.
To do so, you have 2 options
- Use a Linux laptop to edit the file prior booting up the USB stick
- When the error message appears on the screen, press ALT + F2 to start another shell window and login as root (password is nutanix/4u) to get access to the file system.
NUC G7 are having some issues with current Nutanix CE release and the set of drivers which cause the CE to not detect the NIC. There is a work around here.
Once done, boot on the USB stick and log in as install user (no password). It will ask for your keyboard layout and then prompt for the network settings.
 |
| Network details |
You know the node is ready when you see a login prompt with the IP address of the CVM.
Creating a cluster
For a single node cluster, setup is straight forward, you need to check the box "Create single-node cluster" and then you are good to go.
For multi-node cluster (3 or 4), you need to prepare all the hosts and then, once ready, logon to one fo the newly created CMV using nutanix user (password nutanix/4u) and type the following command :
nutanix@NTNX-010422a0-A-CVM:10.10.10.201:~$ cluster -s 10.10.10.201,10.10.10.202,10.10.10.203 create
ERROR:root:Failed to get CVM id
2018-01-12 13:40:07 INFO cluster:2420 Executing action create on SVMs 10.10.10.201,10.10.10.202,10.10.10.203
2018-01-12 13:40:11 INFO cluster:1039 Discovered node:
ip: 10.10.10.203
rackable_unit_serial: 68fa6087
node_position: A
node_uuid: 000dcc21-5bdd-4737-9f23-40559c2cb455
2018-01-12 13:40:11 INFO cluster:1039 Discovered node:
ip: 10.10.10.202
rackable_unit_serial: 54e8fd1a
node_position: A
node_uuid: 72968f75-89ae-4051-b7b0-97af4b7787d4
2018-01-12 13:40:11 INFO cluster:1039 Discovered node:
ip: 10.10.10.201
rackable_unit_serial: 010422a0
node_position: A
node_uuid: 977e2f84-96e4-4613-a6d1-6b4f71944035
2018-01-12 13:40:11 INFO cluster:1057 Cluster is on arch x86_64
2018-01-12 13:40:12 INFO cluster:1183 iptables configured on SVM 10.10.10.201
2018-01-12 13:40:14 INFO cluster:1183 iptables configured on SVM 10.10.10.202
2018-01-12 13:40:16 INFO cluster:1183 iptables configured on SVM 10.10.10.203
It will take some time and eventually, you will get the following screen :
The state of the cluster: start
Lockdown mode: Disabled
[...]
CVM: 10.10.10.203 Up
Zeus UP [24103, 24144, 24145, 24152, 24221, 24240]
Scavenger UP [23158, 23188, 23189, 23190]
SSLTerminator UP [24878, 24927, 24929, 24930]
SecureFileSync UP [24882, 24937, 24938, 24939]
Medusa UP [25059, 25140, 25141, 25194, 25662]
DynamicRingChanger UP [29746, 29818, 29819, 29968]
Pithos UP [29753, 29859, 29860, 29948]
Mantle UP [29797, 29905, 29906, 29955]
Hera UP [29822, 29927, 29928, 29929]
Stargate UP [30320, 30385, 30386, 30656, 30657]
InsightsDB UP [30323, 30382, 30383, 30525]
InsightsDataTransfer UP [30331, 30416, 30418, 30461, 30463, 30464, 30465]
Ergon UP [30359, 30452, 30453, 30454]
Cerebro UP [30403, 30493, 30494, 30716]
Chronos UP [30426, 30526, 30527, 30642]
Curator UP [30434, 30523, 30524, 30688]
Prism UP [30534, 30573, 30574, 30651, 32603, 32613]
CIM UP [30541, 30625, 30626, 30640]
AlertManager UP [30552, 30618, 30619, 30665]
Arithmos UP [30792, 30839, 30840, 31111]
Catalog UP [30826, 30927, 30928, 30932]
Acropolis UP [30861, 30959, 30960, 30961]
Uhura UP [30876, 30980, 30981, 30983]
Snmp UP [30886, 31002, 31003, 31005]
SysStatCollector UP [30915, 31014, 31015, 31018]
Tunnel UP [30953, 31081, 31082]
Janus UP [30994, 31095, 31096]
NutanixGuestTools UP [31103, 31207, 31208, 31270]
MinervaCVM UP [31981, 32034, 32035, 32036, 32643]
ClusterConfig UP [31987, 32101, 32102, 32137]
APLOSEngine UP [32000, 32148, 32149, 32155]
APLOS UP [1023, 1151, 1152, 1153, 1303, 1309]
Lazan UP [1140, 1182, 1183, 1184]
Delphi UP [1155, 1218, 1220, 1221]
ClusterHealth UP [1189, 1257, 1258, 1321, 1344, 1345]
2018-01-12 21:42:24 INFO cluster:1277 Running CE cluster post-create script
2018-01-12 21:42:24 INFO cluster:2533 Success!
nutanix@NTNX-010422a0-A-CVM:10.10.10.201:~$
Now, you can connect to one of the CVM IP and you will get access to Prism Element.

Once password has been changed, you need to register yourself with your .NEXT community account.

 |
| Prism Element Home screen |
Next step is to configure your brand new cluster.
Cluster Details
Click on the "unnamed" cluster details on the top left of the interface, it will pop a detail Windows where you can rename the cluster and provide extra IP addresses

Cluster name is a friendly name you provide to your cluster.
Cluster VIP address is the address you are accessing for any cluster related activities : accessing PE, accessing CVM via SSH, any acli command, ... It helps when a node is down, you can always reach the cluster.
iSCSI Data Service is for accessing your cluster storage via ABS (Acropolis Block Storage).
Network
We still have some tasks to do before starting to create our first VM : configure NTP, DNS and a network for VMs. From the gear menu (top right), go to NTP servers and make sure you have some valid public NTP server to sync our cluster. This is mandatory to have sync on every cluster components.

Next, check the name servers (same gear icon, chose Name Servers). In this case, for ease of configuration, I'm choosing Google's public DNS.

Next, let's create a VM network. From the gear icon, go to Network Configuration. Choose User VM Interfaces and click Create Network. Give it a name that speaks by itself (VM_NET is a good example). If you have no VLAN tagging in your lab, just use 0. I recommend to enable the IPAM since it will provide a real easiness in IP management. Create a pool of IP and override the DHCP so no external DHCP can break your VMs IP assignment.


In this case, the internal Nutanix DHCP will always attribute the same IP to VMs. It looks like there is an internal reservation per Mac Address (to be confirmed by experts) but I always found this feature very handy.
Host
|
Role
|
10.10.10.101
|
Physical NUC-1
|
10.10.10.102
|
Physical NUC-2
|
10.10.10.103
|
Physical NUC-3
|
CVM
|
Role
|
10.10.10.201
|
CVM for NUC-1
|
10.10.10.202
|
CVM for NUC-2
|
10.10.10.203
|
CVM for NUC-3
|
VM_NET
|
Role
|
10.10.10.50 – 69
|
DHCP Pool for VMs
|
10.10.10.49
|
Nutanix DHCP
|
Misc
|
Role
|
10.10.10.40
|
Prism Element Virtual IP
|
10.10.10.41
|
iSCSI Data Service IP
|
Now that we have the network and the cluster ready, we are almost operational, we need an ISO to boot from.
The image server is where you serve your ISO to create VMs. You can also serve direct disk for virtual appliance roll out. Let's add a CentOS ISO to start our first VM. From the gear icon, choose Image Configuration and then Upload Image.

Once done, you will have a new image available to create VMs (and/or templates VMs).
Creating VMs
At last, this is where we wanted to be even before receiving the hardware ;) From the home drop down menu, choose VM and then switch to table view.


Next, click create VM.
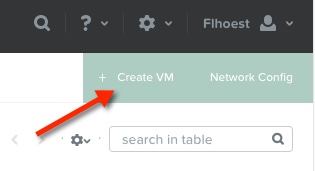
Now, the funny part is starting. Give the VM a name, amount of CPU (and cores) and Memory (in Gigabyte). Next, you need a boot drive. Initially, it will be a virtual CD-ROM with an ISO that you have created earlier. next to the CD-ROM click on edit (the pencil) and choose to clone from image service then select the relevant CentOS image that we have created earlier.

This is important to note that Nutanix always works with thin provisioning disks (if not stated differently). This is really handy, you do not need to make complex calculation. Good point : you can always increase the disk size later if required.
Writing about changing things, amazingly you can change the amount of CPU and RAM while the VM is running. Yes, crazy ;)
Last thing before we can start our VM : we need to add a NIC. Just push the add NIC button and select our VM_NET created before.

If you do not require a special IP in the DHCP pool, leave the IP address field empty, Nutanix IPAM will deal with it for you. Next, click Add and save. The VM is ready to be started !

The red dot indicates the VM is powered off. To start it, click on Power On below the VM list in the action pane.

When the VM is powered on, you can click on Launch Console to see the console. Hopefully, you will see the CentOS installation screen.

The console screen is very fast and responsive. It is using VNC in the background and does not require any plugin to be installed. Works in almost every modern browsers (here Chrome). From the console window, you can send Alt-Ctrl-Del or take a screenshot and perform some power actions too.
You should not spend too much time in this console window since once the machine got networking configured, remote access is the rule.
This is closing the general deployment of Nutanix Community Edition. I will add some more advanced sections later on.
The beast is alive
I was able to push a little bit harder the cluster and been able to run a maximum of 30 VMs. I think this little platform can serve VDI, this is the next topic on my plate.

Conclusion
The Nutanix Community Edition is proposing a full package of free HCI infrastructure that can easily be deployed on any recent hardware and provides the same features and flexibility as the commercial release. What's next ? I can certainly build a more performant package using more powerful hardware with 10 GE interfaces but it all depends on the need. This was a PoV (Proof of Value) which can already serve few VMs. Perfect for training lab, very portable, affordable. If your plan is to create DR site or performing migration between data centers (or mine some bitcoins :p), think at something more robust.
Please feel free to add comments, raise questions or request to change information that might feel wrong. If you need more advanced experts comment, you always have the community ready to assist.


Hi,
ReplyDeleteGreat write up - thanks for sharing. I am looking at setting up a similar style lab to run CE.
When you say you cant really do HA, can you still perform live migrations, test host failures, configure RF2?
Thanks.