Domoticz : Monitor Solar Panels Production (Part 3)

Since the lovely box is now created, let's see how we can improve the reporting. ThingSpeak and MATLAB cannot provide me with the relevant reporting - simply because I need time to learn how it works and honestly, I have something else in mind. I have a home automation platform at home called Domoticz, may be I can get something out of it !
Domoticz
Domoticz is an open source home automation platform which allows you to control many devices in your house and can report environmental status. Any device able to communicate can actually be controlled or report information from/to Domoticz. It supports various protocols and is very easy to learn.
There is a list of sensors that can be populated by different devices, like temperature and humidity sensors. Once data is populated, you can display graphics with different levels of aggregation (week/month/year). It would be nice to have that for our PhotoMeter sensor !
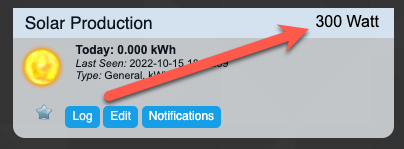
Sneak peak, here is what it looks like with some days of data :

First thing first. I'm assuming you already have Domoticz installed - installation guide is here. We will create a virtual hardware and a virtual/dummy sensor.
It means it is not associated with any physical device, this is only a placeholder and we will manage the data ingestion manually with REST API calls.
Virtual Hardware
From the Setup menu, go to the hardware section. At the bottom of the table, you see some fields to create a new hardware :

Let's call it ThingSpeak, type is dummy and push Add. Now, you have a new entry in the list of hardware. There is a button close to the hardware type to add virtual sensor. Click on it :

There are many different type of virtual sensors, they all have different visualisation features. The type we need here is "Electric". Let's call it Solar Production and push OK :


From the main Domoticz UI, choose the "Utility" tab at the top, we have a new sensor :

Let's customize it with an icon, a name and a description. Type should be "Return" and Energy read is "computed". Indeed, our device is returning the real time power :

Before pushing the "update" button to save the changes, note the Idx number. We will need it in the next section.
API Calls to the Rescue
Now, we have a sensor ready to be populated with data. The plan is to read our values from ThingSpeak every minutes and write the latest entry to the sensor.
One of the way to write data on a Domoticz sensor, is to do a http request to a specific URL which redirect the data into the sensor DB.
Example, writing 300 W to our sensor can be done by entering this URL into a browser.
https://192.168.x.x/json.htm?type=command¶m=udevice&idx=5727&nvalue=0&svalue=300;0
The result in the browser window, when everything is successful, is the below JSON response.
{
"status" : "OK",
"title" : "Update Device"
}
You can access the above URL a couple of times, so multiple values will be pushed into the DB. When we have enough values, if you click on the Log button, you will see some graphs.

Notes
1) The graph resolution in Domoticz is 5 mins. There are a couple of requests to change this to at least 1 min. At this stage it is not implemented in the UI but apparently it can be changed directly in the DB. I've seen a post on GitHub on that topic. If this resolution is not enough for you, you probably will have to find another mean to display your results, or stick to the ThingSpeak interface. For me, the resolution is more than enough.
2) The full API reference of Domoticz is documented here.
We know how to write to a sensor, we now need to understand how to read from ThingSpeak.
I haven't found any pre-existing code so, I created mine. It's available on my GitHub. It consists of two files : tsFramework.php and tsDomoticz.php.
In my case, I'm using a Raspberry Pi to run Domoticz, so this is where I will copy the two files and execute the script. The script location in the Domoticz filesystem is ~/domoticz/scripts/ and I have created a php subfolder to make things clean. This is where my php scripts reside.
Before moving forward, we need to customize few variables in tsDomoticz.php.
// Set your time zone for data retrieval
date_default_timezone_set('Europe/Brussels');
// ThingSpeak Channel ID for retrieving data
$channelID="<channel_id>";
// ThingSpeak read API key
$apiKey="<read_api_key>";
// Domoticz Sensor index
$sensorIDX=<domoticz_sensor_idx>;
// Domoticz host IP
$domoticzIP="<domoticz_server_ip>";
When the php script is ready, you can simply run it every x mins to populate the Domoticz sensor. I have created a bash script to do so.
-> SolarUpdate.sh
#!/bin/bash
cd /home/pi/domoticz/scripts/php
php tsDomoticz.php
I'm running this script every minutes
$ crontab -l
* * * * * /home/pi/domoticz/scripts/php/SolarUpdate.sh
The resolution is 5 minutes, so why am I pulling / pushing data every minute ?
Good question !
We are pushing from the Arduino to ThingSpeak every 20 seconds and pushing to Domoticz every minute but the graph have 5 mins resolution. This is a matter of accuracy. I don't want to lose too much accuracy while transferring from one system to another. If one day Domoticz natively allows 1 minute resolution in the graphs, I'm ready, the data is already in the DB and this is only a matter of display.
Initially, I was not aware about the 5 minutes resolution, I realized it while developing the code. I decided to keep it that way since I know the data is stored in the DB at every push. So again, this is only a matter of displaying the information.
So, today we have seen how to push ThingSpeak data to a virtual sensor into a Home Automation platform. Domoticz is reporting the data and compute the production hourly, weekly, monthly and yearly. This is exactly what I was looking for.
Conclusion
Our project is really progressing well. We have a data reporting chain in place, so from the the IT side of things we are good. Probably some bug fixing or optimization will have to take place.
So, how can we improve our project ?
- I still have in mind to add a screen to it;
- Print a real professional PCB;
- Create a logo for the product and start packaging
I'll see you in the next episode and I hope this helps ;)


Comments
Post a Comment
Thank you for your message, it has been sent to the moderator for review...